Growing up, my grandmother always told me, “Sewing is a basic life skill, and if you want to save money, you need to learn how to sew.” I didn’t really take that into consideration until I got older, and I started taking a look at the monotony and predictability of mass-produced clothing. What if I took what my grandmother said and made it a reality?
Now, I’ll be honest, learning to sew is not an easy feat; It takes patience, time, and determination, but it is possible and worth it! If you’re learning how to sew, I have a few great sewing tips for beginners. These tips are tried and true, and you’ll be sewing like a master in no time!
Just like any hobby, you don’t want to go too big, too quick; Basic sewing doesn’t require a sewing machine, but we’ll get more into that later. When you first start sewing, one thing you should definitely do is get together your very own sewing kit. This should include things like needles, shears (or scissors!), pins, and thread.
You can get fancy and include things such as beeswax and a seam ripper. Still, I would definitely suggest getting thimbles, which are basically lifesaver, or should I say, finger savers. So now that you have your kit, where do you begin? Let’s start with some hand sewing tips for beginners.
Do you have a particular question about starting with the sewing? Then use the table of contents below to jump to the most relevant section. And you can always go back by clicking on the arrow in the right bottom corner of the page. Also, please note that some of the links in this article may be affiliate links. For more details, check the Disclosure section at the bottom of the page.
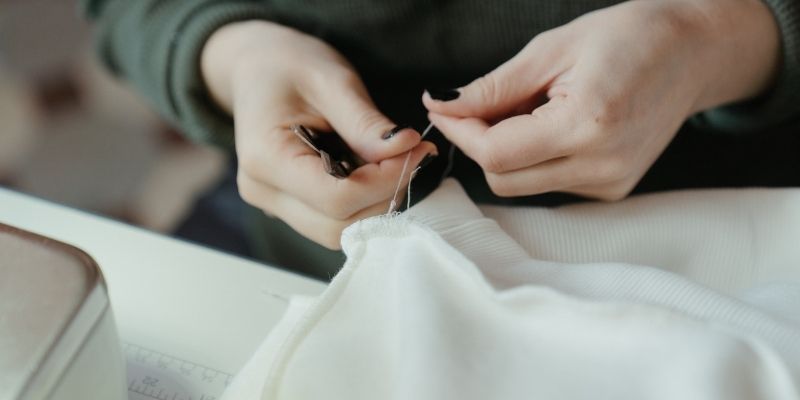
Tip #1: All About Threading
To learn how to sew, we need to first learn the most frustrating part: threading a needle. You may want to practice with a needle with a bigger eye (or the small hole) before you start your project, and if you have it, get your beeswax ready!
But first, decide if you want a single strand or a double strand of thread. A double thread is stronger, and you’ll get the project done twice as fast, but it is more complicated, considering you need to thread two strands through the eye of the needle. To make a double strand, simply use twice the length of thread required for your project. For example, if your project calls for 1 yard, make sure you pull two yards out. After you have the required amount of thread, simply fold it in half, ensuring that both sides are even.
Next, decide what size needle you want to work with; This depends on several factors. For example, if working with a knit style of fabric, you may want a more blunt needle instead of a sharp one. The needle you choose should have an eye wider than the thread you’re using but thin enough that you can make a knot at the end without triple or quadruple knotting it!
Here comes the challenging part: Threading the needle. To thread your needle, regardless of the number of strands, make sure your hand is steady, and your strand or strands of thread are intact and not frayed. Hold it in your dominant hand and your needle in the other. Try to push the thread through the eye of the needle, and if you’re having a hard time, don’t panic!
Simply put some beeswax on the very edge of your thread; This makes threading easier. There are other options if you don’t have beeswax, including a needle threader and even your mouth! Try licking the end of your thread, and see the difference!
When pulling your thread through the needle, make sure you don’t completely pull the thread through the eye, or you’ll have to start again. Only pull about two inches of thread out through the opposite end of the needle; This is where we’ll knot.
If using a double strand, pull up to four inches from the end of the loop side and pass the two tail ends through the loop, creating a small knot; This stops the thread from sliding on the needle mid-project. To knot the tail end of the thread, wrap the tail end or ends around your middle finger two to three times. Then, while pinching the thread between your middle finger and thumb, roll the thread using your middle finger towards your thumb. If done correctly, you will be able to pull the working end of the thread with your opposite hand, forming a knot.
Tip #2: Basic Stitches
So we’ve threaded our needle, but how do we actually stitch? With beginner sewing, it’s important to learn how to stitch by hand first. For the sake of learning, we’ll focus on two types of stitches: The Running Stitch and The Backstitch. I suggest practicing these stitches on a scrap piece of fabric to learn how to do them and get more comfortable.
The Running Stitch is the perfect stitch to start sewing for beginners, as it is one of the more simple stitches.
Start with your needle on the wrong side, or backside, of the fabric. Pull the needle up through the material until the knot touches. Then, if you are right-handed, bring the needle over to the left and insert the needle into the fabric’s right side or the front. If you are left-handed, work left to right. Continue this motion until you’re comfortable.
The Backstitch, on the other hand, is a little more complicated but is a stronger stitch.
This stitch is good for sewing holes in clothing or small sewing projects. Start on the wrong side, or backside, of the fabric, and push your needle towards the fabric’s right side, or the front. Just like the running stitch, push the needle back through to the wrong side. Now, bring the newly threaded strands through the first hole you made, overlapping the stitch you’ve already made. This is called an anchor and will keep the stitches from coming through the fabric. Repeat this step once more, and continue on. Backstitching is tedious but is good for parts of clothing that see a lot of wear and tear.
Tip #3: How To Hand Stitch A Seam?
To stitch a seam, you’re going to do a specific type of stitch, but instead of one piece of fabric, you will be using two. Learning how to stitch a seam is the first step to sewing clothes. Place the two pieces of fabric together, right sides touching and wrong sides facing out. There are a few different types of seams, but in most sewing projects for beginners, you will be using either a plain seam or a double seam. The type of seam you use completely depends on the project and materials you have, and the type of stitch.
For a plain seam, simply stitch a straight line, making sure to leave some fabric on either side of the stitch. For stretchy or knit fabrics, you can try stitching in a zig-zag to give the fabric wiggle room. On the other hand, a double stitch seam is very similar to a plain seam, except, you guessed it, there are two stitches! A double seam provides a stronger hold for your projects, which will stand the test of time.
Tip #4: Sewing Machine How-To
So we know how to hand stitch, but let’s take it up a notch and learn how to use a sewing machine. I have some great tips for using a sewing machine, and the first, and most important, is to choose the right sewing machine for you. Pick a sewing machine that is easy to use, convenient, and cost-effective for you. However, keep in mind that you do get what you pay for. Many sewing machines have built-in stitches, which make sewing a breeze!
Now that we have the perfect machine, we have to learn how to use it! Get familiarized with your new machine, learning where the spool pin (where the spool of thread goes), the thread guide, and the bobbin winder (we’ll touch more on that in a minute) are. Find your thread take-up lever, which should be located by your thread guide, as well as the tension dial. The tension dial is essential as it controls the tension of your thread.
Going back to bobbins, let me take a minute to explain to you what they are and why we have them. The bobbin is inserted into the sewing machine and holds thread, more specifically, the bottom thread. This vital part of the machine makes stitches properly hold, and without it, you won’t get a good stitch.
To start using your machine:
- Make sure it’s set on a sturdy surface.
- Secure your needle, making sure the flat side is in the machine.
- Insert your wound bobbin, and thread your device with the proper thread.
- Make sure both of your threads are out and start sewing!
Tip #5: How To Start Sewing Clothes?
Sewing clothes for beginners can be daunting, but fear not! A quick Google search shows many sewing patterns for beginners, but there are a few things you need to know before you choose one. First, learn the terminology behind sewing. Sure, you know what a bobbin is, but do you know what a dart is? (Hint: It’s not something you throw at aboard!)
When choosing a pattern, make sure you search the words “Simple,” “Easy,” or “Beginner.” Some designs are incredibly complex and will most definitely confuse you! Most patterns have recommendations on the fabric you choose, but if you have your heart set on one, make sure you include the fabric type in your search. And a little Pro Tip: Fabrics that are knit or cotton are some of the easiest to work with!
You will definitely need a few more tools than just some fabric and thread to make your own clothes. A measuring tape, for example, will get your projects looking professional. Seam rippers are great for those mistakes, and a chalk pencil is great for marking your fabrics.
Tip #6: How To Sew From A Pattern?
So you have your pattern, but now what? To make the clothing fit, you need to measure the person who will be wearing it! Have a friend or family member help you with this step. Make sure your measurements are in the same style as the patterns to avoid any conversion confusion.
Be wary of multi-size patterns, and make sure you choose the right size pattern for your measurements.
By far, the most important step of sewing from a pattern is leaving room for error. Nobody’s perfect, and an essential bit of sewing advice is to leave room to learn. There’s nothing worse than thinking you finished a project, to find out it’s an inch too small!
Reading a pattern is just like putting together that piece of IKEA furniture. Actually, it’s much easier! Every pattern comes with step-by-step instructions, which you follow to the letter.
Learning to sew is a timely process, but it’s so worth it at the end when you’re wearing your first handmade article of clothing. It’s a basic life skill that everybody should know, and now you know the basics!
Here are some more tips and tricks for beginning sewers:
1. Do a test stitch on all fabrics before you start your actual project; There’s nothing worse than starting a project on a new bolt of fabric and having to buy a whole new one!
2. Wind extra bobbins of frequently used thread colors to save time in the long run.
3. Keep a magnet handy for the inevitable needle drop!
4. Understand that you’re a beginner, and even experts make mistakes! Don’t give up. You can, and will, finish this project! And never stop learning. If you feel like this guide is not enough, you can go ahead and check this article from Instructables.
Credits: photos by Canva

Disclosure: at sewingyourstyle.com we only write about the products that we’ve researched and considered worthy. But it’s important to mention that we are a participant of several affiliate programs, including Amazon Services LLC Associates Program, an affiliate advertising program designed to provide a mean for us to earn fees by linking to Amazon.com and affiliated sites. As an Amazon Associate sewingyourstyle.com earns from qualifying purchases.